March 8, 2011 (See also Companion Blog )
[Go BACK to Table of Contents] [ Next Experiment ] [ Last Experiment ]
To program the Arduino to calculate the length of a hypotenuse, and to print it out to the serial monitor in plain English.
There is no circuitry in this code. It is all code that is uploaded to the Ardunio for processing. But if everything goes right, the output should look like this:

Theory:
The Arduino reads two input values, calculates a new value and prints all three values to the serial monitor. The progress of this experiment is the math, plus the fact the Arduino is generating a value that can be read on the remote computer. The computer is a component of this circuit, without it you could not view the results.
Practice:
Qualified success. The Arduino can only handle integers in this experiment, so the values of Side A and Side B have to be chosen carefully to result in a whole number.
Conclusion:
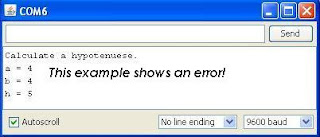
Math on the Arduino is as lame-brained and needlessly difficult as any other function in C code. The best thing to be said is that it works. The so-called “elegant” C language truncates any fractional parts without issuing any warning. The result is nonsense, like the following that shows the hypotenuse as 5 units, an obvious error.

This experiment raises some questions. Can the results sent to the serial monitor be sent to other devices? The Arduino has no monitor, but I’ve seen it driving an LCD. Can the results of the math be stored on computer? On a flash drive? In an array? It seems to me a robot would behave better if it could rely on experience or “what worked right last time”, in combination with refined decision-making code. That sounds like a fancy way to say Artificial Intelligence.
Here is the code.
// Matches Experiment 013
// Today is March 08, 2011

/* This is a test of the math functions - a first here for me!
 * It is copied from an Arduino Lesson 4 sheet found on-line
 * "Arduino grows up and learns to talk".
 * This experiment is how to do Arduino arithmetic.
 */

// INITIALIZATION
#include "math.h"
int a = 4;
int b = 4;
int h;
///////////////////////////////////////////////

///////////////////////////////////////////////
// MAIN PROGRAM
// Note: there is no void loop(), this code runs once and stops.
void setup()
{
   Serial.begin(9600);    // open serial port and send
                          // data to computer at 9600
   Serial.println("Calculate a hypotenuese.");

   Serial.print("a = ");
   Serial.println(a);

   Serial.print("b = ");
   Serial.println(b);

   h = sqrt(a*a + b*b);

   Serial.print("h = ");
   Serial.println(h);
}

void loop()
{
// runs continuously, but does nothing.
// note, the curly brackets are still required.
}
/////////////////////////////////////////////////////////////
// End Main Program
/* Created 2011-03-09
 * Keyentered by Anton da Bassguy.
 * First successful trial 2011-03-09
 * Keep in mind, the material that displays on the computer
 * is being sent from the Arduino chip, not computer memory.
 * This is all new ground for me.
 */

Go BACK to Table of Contents
For Official Use Only
C:\Documents and Settings\Do Not Use\My Documents\8000 Series Files\8010 ARDUINO\2000 Minutes\Jpegs 2011-03 (Mar)
C:\Documents and Settings\Do Not Use\My Documents\8000 Series Files\8010 ARDUINO\2000 Minutes\Minutes 2011-00 (Intro)
